
NotebookLM as a Content Pipeline: From Blog Posts to Branded Visuals
I set up notebooklm-py as a programmatic content creation pipeline for CryptoFlex LLC, building a custom agent and skill that turns blog posts into branded infographics and slide decks with automated QA. Here is how the security review went, what the pipeline looks like, and what I learned about trusting reverse-engineered APIs.
One CLI wrapper, one custom agent, one skill definition, and a security review that found three HIGH findings. That's what it took to turn Google NotebookLM into a programmatic content pipeline for my blog.
The goal was straightforward: take any published blog post, feed it into NotebookLM, and get back branded infographics and slide decks that match the CryptoFlex LLC visual identity. No manual copying into the NotebookLM web UI, no hand-tweaking colors and fonts, no forgetting which accent color goes with warnings. Just point an agent at a post and let it handle the rest.
This post covers the tool I chose, why I almost didn't use it, how the pipeline works end to end, and the operational decisions I made along the way.
Series Context
This is part of the Claude Code Workflow series. The previous post covered upgrading the blog post command to a five-agent team. This one adds a downstream content generation pipeline that turns those blog posts into visual assets. It stands on its own if you're just here for the NotebookLM integration.
Why NotebookLM?#
Google NotebookLM is a research and content tool built on top of Gemini. You feed it source material (documents, URLs, text), and it can generate structured outputs: summaries, study guides, audio overviews, infographics, and slide decks. The generation quality is solid, especially for educational content, which is exactly what this blog produces.
The problem: NotebookLM is a web UI. There's no official API. If you want to use it programmatically (from a script, an agent, a CI pipeline), you're stuck copy-pasting into a browser.
That's where notebooklm-py comes in.
Finding the Right Tool#
The library I settled on is teng-lin/notebooklm-py, an unofficial Python wrapper for NotebookLM. It provides both a Python API and a CLI for creating notebooks, adding sources, generating artifacts (infographics, slide decks, audio), and downloading the results. It has 8,600+ stars on GitHub and an MIT license.
I found it through a combination of GitHub search and checking whether anyone had built a programmatic interface to NotebookLM's capabilities. The repo stood out for a few reasons: active maintenance, clean code structure, comprehensive CLI, and native support for the artifact types I needed (infographics and slide decks specifically, not just audio overviews).
But before I installed anything, I needed to understand what I was actually running.
Unofficial Means Reverse-Engineered
There is no official NotebookLM API. Libraries like notebooklm-py work by reverse-engineering the internal endpoints that the web UI uses. This means the library authenticates using your browser session cookies, and Google could break compatibility at any time by changing their internal API. You're building on a surface that isn't guaranteed to be stable.
The Security Review#
I don't install tools that touch my Google account without reviewing the code first. This library authenticates as you, has access to your NotebookLM data, and sends requests to Google's servers. That warrants scrutiny.
I did a thorough security review of the repository. Here's what I found.
What Looked Good#
The codebase is well-structured. Clean separation of concerns, proper error handling, no obvious backdoors or data exfiltration. The CLI is a thin wrapper around a Python API, which is a thin wrapper around HTTP requests to NotebookLM's internal endpoints. Nothing clever or suspicious in the request chain.
Dependencies are minimal. The library uses requests for HTTP, standard library modules for most everything else. The attack surface from transitive dependencies is small.
The Three HIGH Findings#
HIGH 1: Session Cookie Authentication
The library authenticates by capturing your Google session cookies from a browser login flow. These cookies provide full access to your Google account within the scope of the NotebookLM application. They're stored locally, but if your machine is compromised, those cookies are as good as your password for the duration of the session.
This isn't a bug in the library. It's the only way to authenticate against a service that doesn't have an official API. But it means you need to treat the credential storage with the same care you'd give an OAuth token.
HIGH 2: No Official API Contract
The endpoints this library calls are internal Google endpoints. They're not documented, not versioned, and not guaranteed to remain stable. Google can (and does) change internal APIs without notice. A NotebookLM UI update could silently break every command in this library.
This affects reliability, not security per se. But in a pipeline context, a silent breakage that produces no output and no error is functionally a security concern: you're trusting a process that might stop working without telling you.
HIGH 3: Credential Scope
The session cookies captured during authentication potentially grant broader access than just NotebookLM. Depending on how Google's session management works internally, these cookies might be valid for other Google services. The library only uses them for NotebookLM endpoints, but the cookies themselves aren't scoped that narrowly.
Mitigation Strategy
I addressed these findings with three controls. First, I use a dedicated Google Workspace account rather than a personal Gmail account. Second, I installed the library in an isolated Python virtual environment, not in my system Python or any shared environment. Third, I configured Time Machine and Syncthing exclusions for the credential storage directory, so session cookies never end up in backups or cross-machine syncs. More on each of these below.
The Verdict#
The code quality is solid. The security concerns are inherent to the approach (reverse-engineering a web UI), not to the implementation. I decided the risk was acceptable for my use case: generating visual assets from public blog content, on a machine I control, with a dedicated account.
If this were handling sensitive data or running in a shared environment, I'd make a different call.
Installing in a Dedicated Venv#
I used uv to create a dedicated Python 3.14 virtual environment specifically for this tool. The venv lives at ~/.notebooklm-venv/, completely isolated from any other Python project on the machine.
uv venv ~/.notebooklm-venv --python 3.14
source ~/.notebooklm-venv/bin/activate
uv pip install notebooklm
The isolation matters for two reasons. First, dependency conflicts: notebooklm-py pins specific versions of requests and other packages that might conflict with other Python tools. A dedicated venv eliminates that risk entirely. Second, credential containment: the library stores session data relative to its installation, and I want that data in one predictable location.
uv for Disposable Environments
uv creates virtual environments in seconds and handles Python version management cleanly. For single-purpose tools like this, a dedicated venv is the right pattern. If the tool stops working or you decide to remove it, you delete one directory and you're done. No cleanup needed.
The CLI Wrapper#
Rather than activating the venv every time I need to run a command, I wrote a one-line wrapper script:
#!/usr/bin/env bash
# Wrapper to run notebooklm CLI from its dedicated venv
# Installed at: ~/.notebooklm-venv (Python 3.14, uv-managed)
# Account: dedicated Google Workspace account
exec "$HOME/.notebooklm-venv/bin/notebooklm" "$@"
This lives at ~/.claude/scripts/notebooklm.sh. Every command in the agent and skill goes through this wrapper, never through bare notebooklm. That way the agent doesn't need to know about the venv, the Python version, or the activation dance. It just calls the wrapper.
# Instead of: source ~/.notebooklm-venv/bin/activate && notebooklm list
# Just:
~/.claude/scripts/notebooklm.sh list --json
Building the Agent#
The NotebookLM content agent is a Sonnet-powered agent that handles the full pipeline: reading blog content, creating notebooks, adding sources, priming with brand guidelines, generating artifacts, downloading them, and running QA.
Here's the workflow at a high level:
Step 1: Read the Blog Post#
The agent reads the specified MDX file from either the published blog directory or the backlog. It extracts the key information: title, date, series, tags, core concepts, metrics, and any existing diagram descriptions.
Step 2: Create a Notebook#
~/.claude/scripts/notebooklm.sh create "CryptoFlex: <post-title>" --json
Each blog post gets its own notebook. The --json flag on every command is deliberate: it gives the agent structured output to parse instead of human-readable text. The notebook ID is saved and used for all subsequent operations.
Step 3: Add Content as Source#
The blog post's full text gets added as a source. For MDX files, the agent strips JSX components before adding (NotebookLM doesn't need to understand React components, it just needs the prose and code examples).
~/.claude/scripts/notebooklm.sh source add-text "$(cat <blog-post-path>)" \
  -n <notebook_id> --json
Step 4: Prime with Branding#
Before generating anything, the agent sends a chat message to the notebook that establishes the CryptoFlex LLC brand guidelines:
~/.claude/scripts/notebooklm.sh ask "When creating visual content from this
  material, use these guidelines: Use a dark background with cyan (#47BACC)
  as the primary accent color. Use emerald green for positive outcomes, amber
  for warnings, and red for critical items. Keep the tone professional and
  educational. The brand is CryptoFlex LLC. Author is Chris Johnson." \
  -n <notebook_id> --json
This priming step is the key to consistent output. Without it, NotebookLM generates artifacts with its default styling, which doesn't match anything on the site. With it, the generated infographics use the right colors, the right tone, and the right attribution.
Prime Before You Generate
NotebookLM's generation quality improves significantly when you give it brand context through a chat message before requesting artifacts. Think of it as setting the stage. The model retains the priming context and applies it to all subsequent generation requests in that notebook.
Step 5: Generate and Download#
The agent requests the specific artifact type (infographic or slide deck) with parameters for orientation, detail level, and visual style:
~/.claude/scripts/notebooklm.sh generate infographic \
  --orientation landscape \
  --detail detailed \
  --style professional \
  -n <notebook_id> --json
Generation takes 5 to 15 minutes. The agent uses artifact wait with a 15-minute timeout, then downloads to a structured output directory:
~/GitProjects/cryptoflexllc/content-assets/notebooklm/
  <post-slug>-infographic.png
  <post-slug>-slides.pdf
  <post-slug>-slides.pptx
Step 6: QA Review#
This is where the agent earns its keep. After downloading, it performs a structured QA review across four dimensions:
Spelling and Grammar: Checks all text content for misspellings, grammar errors, and (crucially) em dashes. The house style rule applies to generated content too.
Content Accuracy: Cross-references every claim, metric, and technical detail in the generated asset against the source blog post. NotebookLM is generally accurate, but hallucinated details can slip in, especially with numbers.
Brand Compliance: Verifies that colors match the defined palette (cyan primary, amber warnings, emerald success), the tone is educational and not promotional, and the CryptoFlex LLC branding is present.
Format and Structure: Checks that infographics are readable at reasonable zoom, slide decks have consistent layouts, and the visual hierarchy makes sense.
The agent produces a structured QA report with pass/fail for each dimension. If anything fails, it attempts revision (up to two cycles).
QA Is Not Optional
Automated content generation without automated QA is a recipe for publishing garbage. NotebookLM generally produces good output, but "generally" is not "always." The QA step catches brand violations, factual drift from the source material, and formatting issues that would look unprofessional if published. Build the QA into the pipeline, not as an afterthought.
The Skill Definition#
The agent handles the work. The skill makes it invocable. The skill definition at ~/.claude/skills/notebooklm-content/SKILL.md provides the user-facing interface:
/notebooklm-content <blog-post-slug-or-path> [options]
Options include content type (infographic, slides, or both), orientation, detail level, and visual style. The skill resolves the blog post path, then delegates to the agent with the full context.
The usage pattern is simple:
/notebooklm-content my-first-24-hours-with-claude-code --type both
/notebooklm-content latest --type infographic --style editorial
One command. The agent handles everything from there.
Credential Security#
The security review findings drove three specific operational decisions.
Dedicated Account#
I authenticate with a dedicated CryptoFlex LLC workspace account, not a personal Gmail address. If the session cookies are somehow leaked, the blast radius is limited to that workspace. No personal email, no personal Drive, no personal Calendar.
Isolated Environment#
The dedicated uv venv at ~/.notebooklm-venv/ means the session cookies and any cached data live in one directory. The notebooklm binary and its dependencies have no access to anything outside that venv. If I need to nuke the credentials, I know exactly where they are.
Backup and Sync Exclusions#
This is the one that's easy to forget. Time Machine backs up everything by default. Syncthing syncs configured directories. I explicitly excluded the venv directory from both.
For Time Machine, the exclusion prevents session cookies from appearing in backup snapshots, which could persist long after the cookies expire. For Syncthing, the exclusion prevents credentials from replicating to other machines on the LAN. Session cookies should exist on exactly one machine, the one where you authenticated.
Credential Hygiene
Session cookies from reverse-engineered APIs deserve the same operational hygiene as API keys: store in one place, exclude from backups, exclude from sync, and know how to rotate (re-authenticate). The fact that they expire naturally doesn't mean you can be casual about where copies exist in the meantime.
The Full Pipeline#
Here's the complete flow from blog post to branded visual asset:
- User invokes
/notebooklm-content <post-slug> --type both - Skill resolves the blog post path and spawns the content agent
- Agent reads the MDX file and extracts key content
- Agent creates a NotebookLM notebook and adds the blog content as a source
- Agent primes the notebook with CryptoFlex LLC branding guidelines
- Agent generates the requested artifacts (infographic, slide deck, or both)
- Agent waits for generation to complete (5 to 15 minutes per asset)
- Agent downloads output to
content-assets/notebooklm/ - Agent runs the four-dimension QA review
- If QA fails: agent revises and re-checks (max 2 cycles)
- Agent reports results with file paths and QA summary
The total time is dominated by the generation step. Everything else (notebook creation, source addition, QA) completes in seconds. A typical run for a single infographic takes 6 to 8 minutes. Both infographic and slide deck together takes 12 to 20 minutes.
Why Not Generate in Parallel?
NotebookLM notebooks handle one generation request at a time. Starting an infographic and a slide deck simultaneously in the same notebook causes one to fail. The agent runs them sequentially when both are requested. This is a limitation of the platform, not the pipeline.
What I'd Change#
A few things I'd do differently if I were starting over, and a few things I'm watching.
Authentication refresh is manual. Sessions expire every one to two weeks. When they do, you have to run notebooklm.sh login and go through the browser-based auth flow again. There's no refresh token mechanism because there's no official API to issue one. This is fine for occasional use, annoying for scheduled automation.
The API surface could break at any time. Google changes internal endpoints without notice. One day the generate infographic command works, the next day it returns a 404 because Google restructured their backend. The library maintainers are responsive about updating for breaking changes, but there's always a gap between Google shipping a change and the library catching up.
QA for visual elements is limited. The agent can check text content for accuracy and brand compliance, but evaluating whether a color is actually cyan or whether the visual hierarchy is effective requires visual understanding that's hard to automate fully. For now, I spot-check the visual output manually after the agent reports its QA results.
Lessons Learned#
Security Review First, Install Second
When a library authenticates with your credentials and talks to external services, review the code before installing. The 30 minutes I spent reading through notebooklm-py told me exactly what I was running and let me make an informed decision about the tradeoffs.
Reverse-Engineered APIs Are Borrowed Time
Building a pipeline on top of an unofficial API means accepting that it might break without warning. Design your pipeline so that a breakage is inconvenient but not catastrophic. In my case, the worst outcome is that I need to generate visuals manually through the web UI until the library updates. Not great, not a disaster.
Isolate Single-Purpose Tools
A dedicated venv for a single-purpose tool is not overkill. It's the right amount of isolation. The tool gets its own dependency tree, its own credential storage, and a clean uninstall path. The cost is one extra directory. The benefit is zero conflicts and zero surprises.
Brand Priming Makes a Real Difference
The difference between generating an infographic with and without brand priming is immediately visible. With priming, you get dark backgrounds, cyan accents, and educational tone. Without it, you get NotebookLM's defaults, which look like generic Google Docs output. Always prime before generating.
What's Next#
The pipeline is operational. The next step is actually using it: running it against the backlog of existing posts to build a library of visual assets. I'm also looking at whether the generated infographics are useful as social media cards for blog distribution, which would add another downstream use case to the pipeline.
If Google eventually ships an official NotebookLM API, the migration path is clean. The agent's workflow (create notebook, add source, prime, generate, QA) stays exactly the same. Only the underlying CLI commands change. That's the benefit of wrapping the tool behind a script and an agent definition: the interface is mine, and the implementation is swappable.
This is post 12 in the Claude Code Workflow series. The config that powers this pipeline (agent definitions, skill definitions, wrapper scripts, and rules) lives in the public claude-code-config repo.
Weekly Digest
Get a weekly email with what I learned, summaries of new posts, and direct links. No spam, unsubscribe anytime.

Related Posts
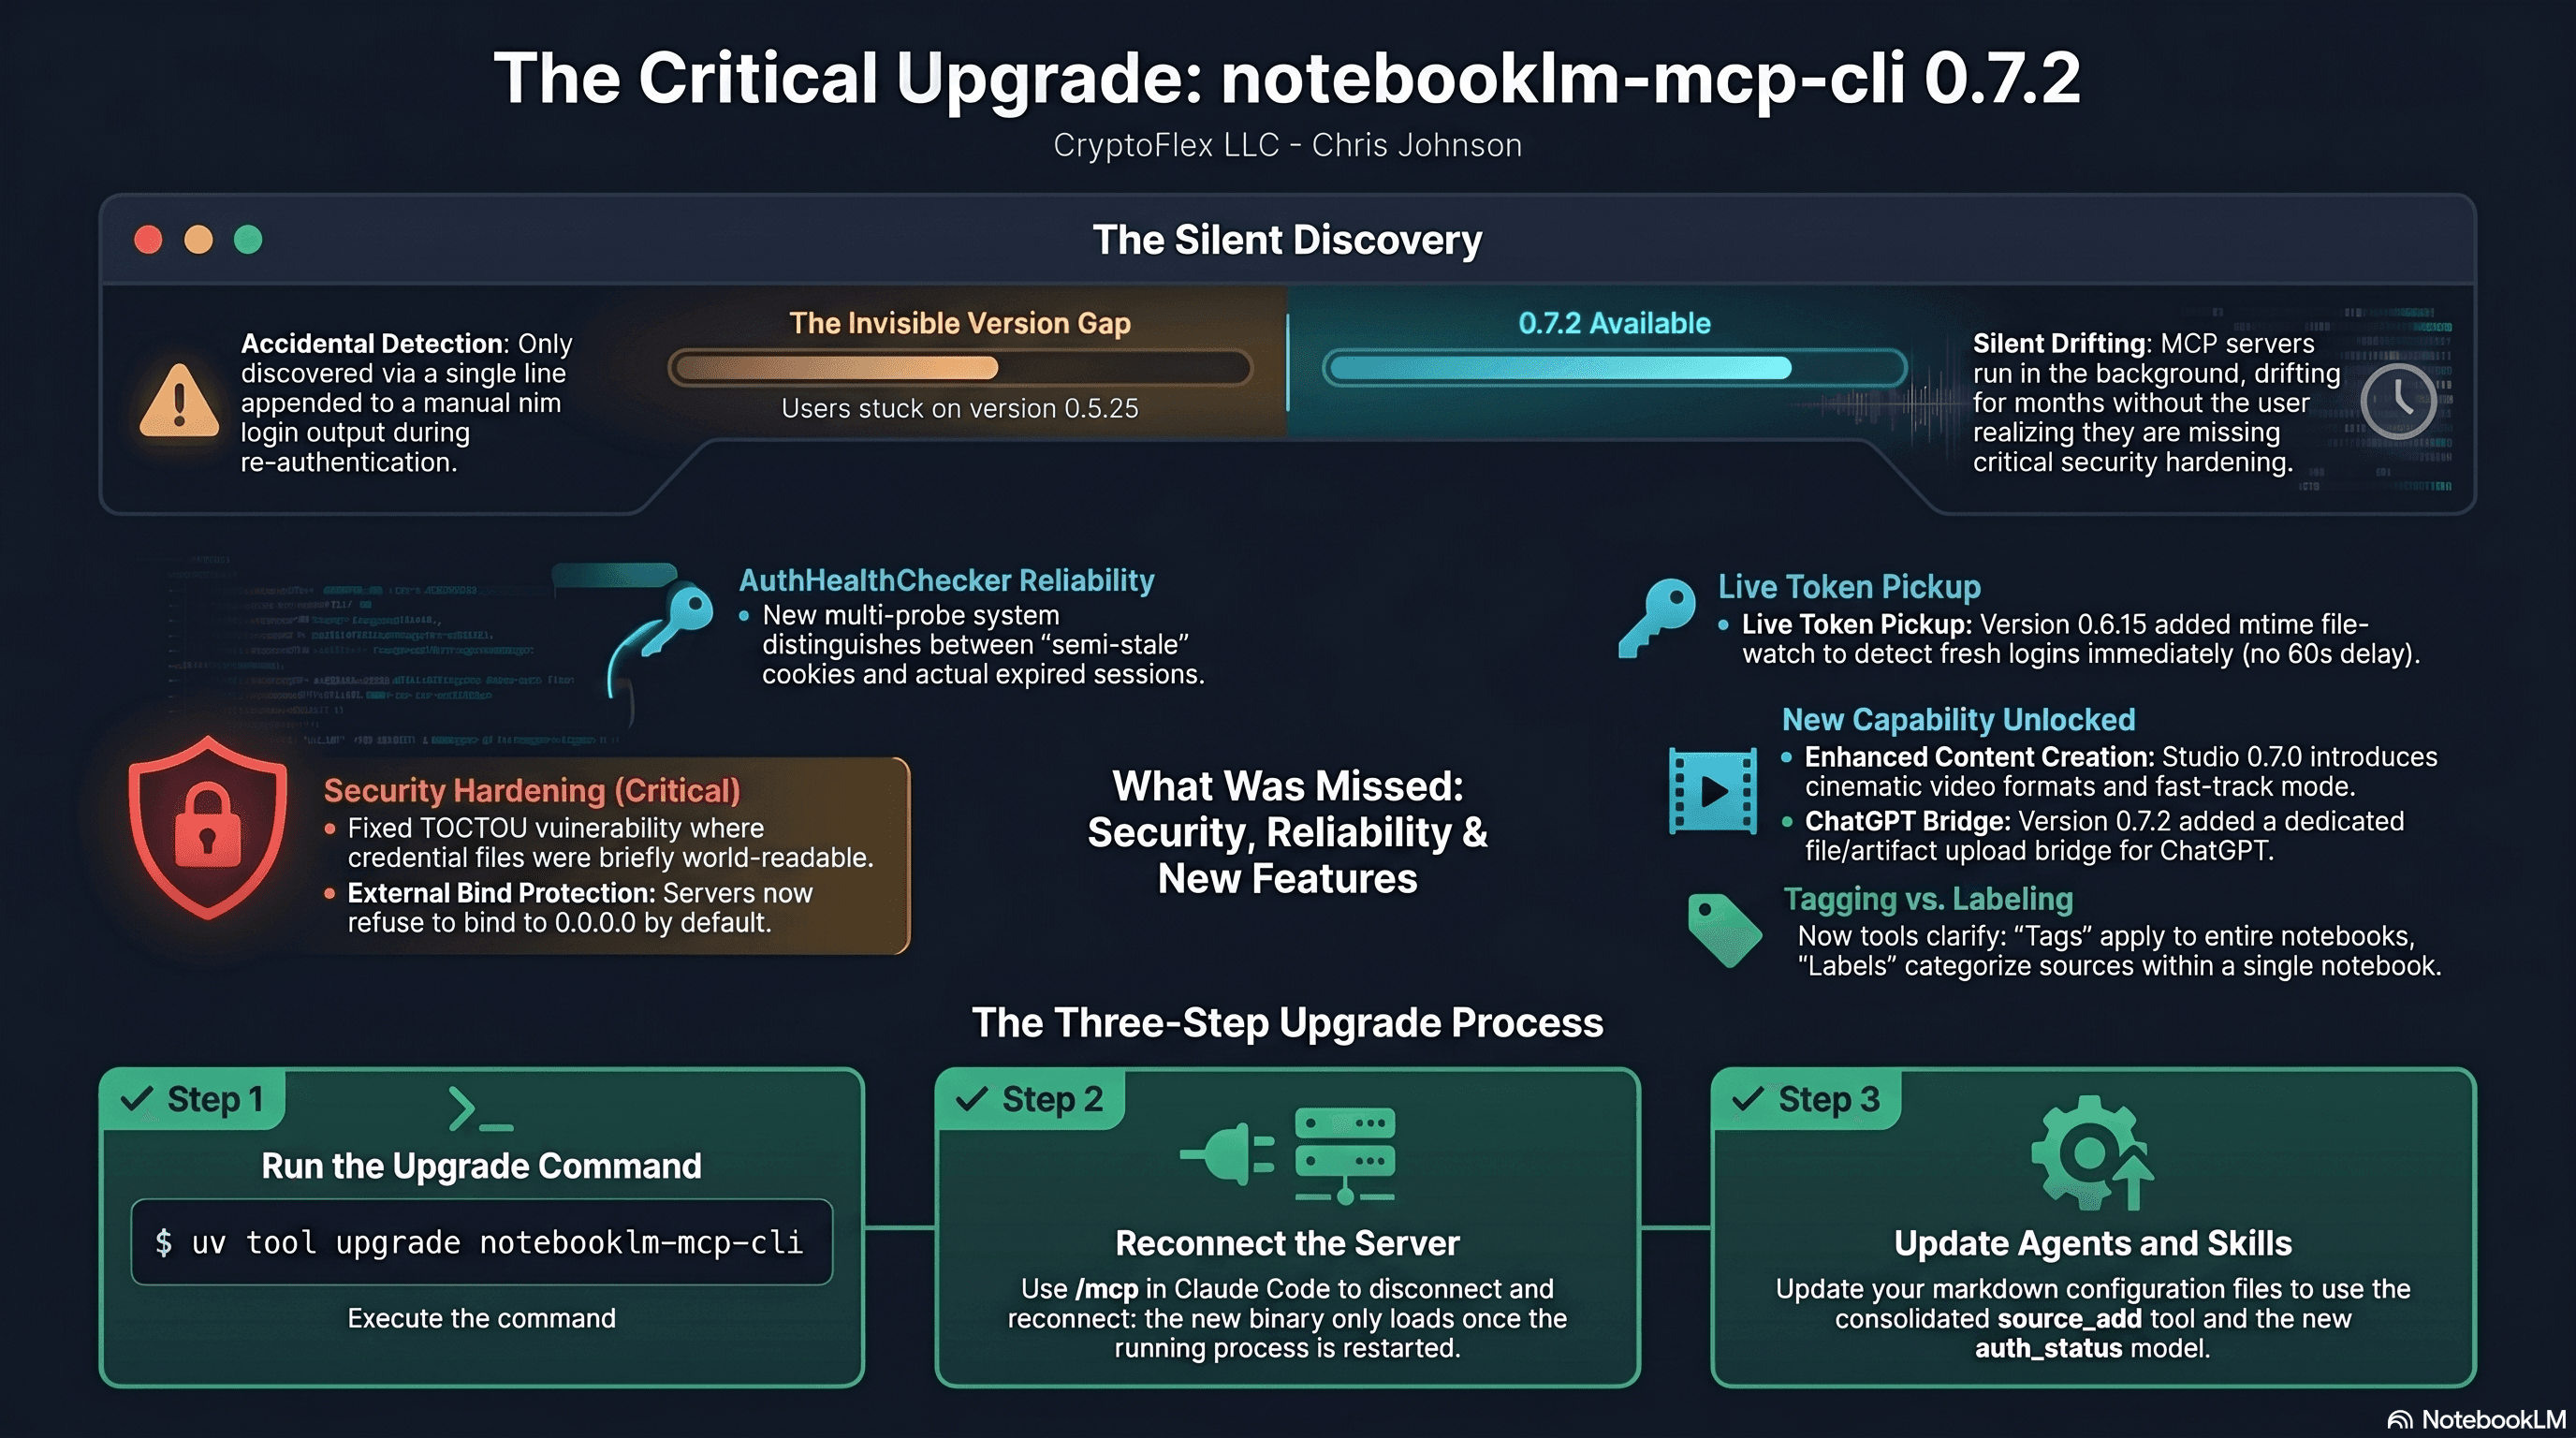
I was two minor versions behind on notebooklm-mcp-cli and had no idea until a re-auth banner interrupted a session. The gap was 0.5.25 to 0.7.2. Security fixes, auth reliability improvements, and new features I was missing the whole time. Here is the three-part upgrade that most people stop after step one.
35 MCP tools, 7 implementation tasks, 2 platforms, 1 session. How I used the superpowers brainstorming, writing-plans, and subagent-driven-development pipeline to integrate NotebookLM into Claude Code as a first-class MCP server.
50 instincts, 13 semantic clusters, 7 accepted candidates, 5 promoted skills. I built the third tier of a continuous learning pipeline that synthesizes behavioral patterns into reusable agents, skills, and commands.
Comments
Subscribers only — enter your subscriber email to comment